This short intro explains why adding an external microphone matters for your shots. Onboard mics often capture wind and distant chatter. An external mic brings clearer audio and makes dialog easy to follow.
- Why external mics matter for action cameras today
- How To Use A Mic With Action Camera: step-by-step setup and settings
- Model-specific connections and pro tips for DJI Osmo Action and Pocket series
- Osmo Action 5 Pro pairing and dual-operator workflow
- Osmo Action 4 / Osmo Action 3 USB-C connections
- DJI Action 2, Pocket 3, Pocket 2 and Pocket
- Gimbal, Ronin and Ronin 4D setups
- Conclusion
- FAQ
- Why do external microphones matter for action cameras today?
- What common audio issues should I expect, such as wind, background noise, and distance?
- Which microphone type works best for different shots?
- How do I check compatibility and inputs like USB-C, 3.5 mm TRS, and required adapters?
- Should I pick wired or wireless microphones for mobility and control?
- How do I connect via adapters and cables for USB-C audio protocol and phone adapters?
- What are secure mounting options like cold shoe, cages, clips, and cable management?
- How do I pair and link wireless transmitters and receivers?
- What reduces wind and background noise besides windscreens and placement?
- How can I monitor audio levels and use on-screen indicators?
- What should I do for a quick test recording and gain adjustments before I roll?
- How does Bluetooth pairing work for DJI Osmo Action 5 Pro with DJI Mic 3/2?
- What connections work for Osmo Action 4 and Osmo Action 3 using USB-C receivers?
- How do I set up USB-C audio on DJI Action 2 via the front touchscreen or Power Module?
- What are the steps for USB-C receiver connection and input monitoring on Osmo Pocket 3?
- How do DJI Pocket 2 and original Osmo Pocket handle 3.5 mm TRS using the Do-It-All Handle or adapter?
- What should I consider when using Osmo Mobile 6 or DJI OM 5 with phones and external mics?
- How do Ronin/RS series and Ronin 4D handle hot shoe mounting, TRS cabling, and audio channel settings?
Simple compatibility checks save frustration: confirm the port, pick the right adapter, and test levels on-screen before you roll. Small windscreens cut outdoor noise. Place a lavalier near the chest or aim a compact shotgun at the subject for better intelligibility.
Keep cables tidy and mount gear so handling noise stays low. Watch on-screen meters and adjust gain to prevent clipping. Wireless kits add mobility but check range and battery life for reliable field use.
By following these basic steps you get clean sound that matches energetic video. The rest of the guide shows practical setups, pro tips, and quick tests that fit most camera rigs and budgets.
Why external mics matter for action cameras today
Onboard audio often fails when movement, wind, or crowds are present. When you move fast or step back, stock audio usually loses clarity and gains unwanted noise. That makes dialog hard to follow and lowers overall video quality.
External microphone choices solve specific problems. Shotgun designs cut side and rear noise so speech stays front and center. Lavalier units pick up voice near the chest for steady narration during motion. Stereo mics preserve ambience when scenic sound matters.
Practical steps improve outcomes:
- Use a furry windscreen outdoors to reduce low-frequency wind rumble.
- Place the microphone closer to the subject to raise signal-to-noise ratio.
- Pick the right adapter and secure the port connection so bumps don’t cause crackles.
Even small upgrades change results. Better placement, a simple wind shield, and the right mount turn noisy clips into crisp recordings. For osmo action users, external products are often the single best upgrade for clear, watchable video.
How To Use A Mic With Action Camera: step-by-step setup and settings
Start each rig by confirming ports and adapters so connections stay reliable. Check the manual for external audio support and note whether the unit offers USB-C or a 3.5 mm TRS input.
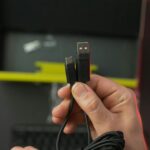
Choose wired when you need zero latency and fewer failures; pick wireless for freedom and clean framing. For USB-C links, use a certified phone adapter or a USB-C to USB-C cable that supports audio protocol. For TRS, use the proper cable and avoid TRRS unless specified.
Mounting, cable runs, and pairing
Mount a compact shotgun on a cold shoe or in a cage. Clip lavaliers near the sternum and route short right-angle cables. Secure slack with Velcro ties to cut handling noise.
Monitoring, wind, and final checks
Pair transmitters and receivers, watch LEDs, and confirm the on-screen indicator moves. Add a furry windscreen outdoors and place the capsule out of direct airflow.
- Set input levels; aim for healthy peaks without red.
- Record a 10–15 second test and play it back.
- If you hear hums, swap the adapter or re-seat plugs.
| Task | Common port | Recommended accessory | Quick check |
|---|---|---|---|
| External input | USB-C | Phone adapter or USB-C audio cable | On-screen meter responds |
| TRS input | 3.5 mm TRS | TRS cable (avoid TRRS) | No intermittent dropouts |
| Wireless link | Receiver | Paired transmitter, spare battery | Steady LED, audio meter movement |
Model-specific connections and pro tips for DJI Osmo Action and Pocket series
Match each model’s ports and menus before you pair devices for a smooth setup. That saves time and prevents lost takes.
Osmo Action 5 Pro pairing and dual-operator workflow
Pairing is Bluetooth-based. Enter Wireless Mic > TX pairing on the osmo action and put each transmitter into Bluetooth mode until the LED blinks blue. Confirm the on-screen prompt reads Connected.
Pro tip: The 5 Pro accepts two transmitters for dual talent. Press the transmitter link button to start or stop recorder-side recording as a backup while the camera captures audio.
Osmo Action 4 / Osmo Action 3 USB-C connections
Plug the DJI Mic receiver into the USB-C port using the official Type-C phone adapter. Third-party USB-C to USB-C cables work only if they support audio transport protocol.
Pro tip: If the input indicator does not move, swap the cable or adapter and reseat the plugs.
DJI Action 2, Pocket 3, Pocket 2 and Pocket
Action 2 accepts audio via the Front Touchscreen or Power Module USB-C ports. Pocket 3 shows an input level bar when the receiver is connected by standard phone connector.
Pocket 2 and original Pocket use 3.5 mm TRS wiring: route a TRS cable from the Do-It-All Handle or the official 3.5 mm adapter to the receiver.
Gimbal, Ronin and Ronin 4D setups
For phones on Osmo Mobile 6 or DJI OM 5, connect the receiver with a phone adapter, then mount and rebalance the gimbal. For RS and Ronin series, slide the receiver into the hot shoe and run a short 3.5 mm TRS cable to the mic input.
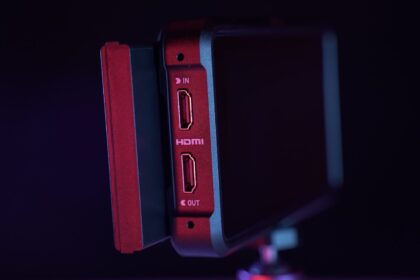
On Ronin 4D, mount the receiver on the top handle shoe, connect the TRS cable to the 4D audio port, and set Channels 1 and 2 to 3.5 mm Mic in settings.
- Quick checks: power on both units, watch the on-screen indicator, and record a 10-second test.
- Swap to a certified adapter or known-good cable if the input does not appear.
| Model | Port | Recommended adapter / quick check |
|---|---|---|
| Osmo Action 5 Pro | Bluetooth | Pair TX in menu; confirm Connected |
| Osmo Action 4 / 3 | USB-C | Type-C phone adapter or USB-C cable with audio transport |
| Pocket series | USB-C or 3.5 mm TRS | Phone connector or 3.5 mm adapter; watch input bar |
Conclusion
A simple pre-roll routine saves time and keeps sound clean across shoots. Pick the right microphone for the scene, confirm compatibility and the exact adapter, then mount hardware firmly so movement does not add noise.
Clean audio is achievable on any camera. Add wind protection outdoors, place the capsule near the voice, then check on-screen levels before recording. A short 15-second test clip reveals gain issues fast.
For osmo action and other DJI products, follow the model-specific steps and watch input meters so your recording is solid. Small, consistent checks turn mixed results into repeatable support for better video and reliable field products.
FAQ
Why do external microphones matter for action cameras today?
External microphones capture clearer sound than built-in mics, especially in noisy or windy environments. They offer directional pickup, better signal-to-noise ratio, and options like lavalier or shotgun designs that keep dialogue and key audio intelligible during fast-paced shooting.
What common audio issues should I expect, such as wind, background noise, and distance?
Expect wind rumble, distant or muffled dialogue, and ambient noise from engines or crowds. These problems reduce clarity. Use windscreens, place the microphone closer to the subject, and choose directional capsules to cut unwanted sound.
Which microphone type works best for different shots?
For run-and-gun vlogging, a compact shotgun or on-camera mic helps. For interviews and dialogue, lavalier mics provide consistent levels. Wireless systems suit action where mobility matters. Consider form factor, mounting, and wind protection when choosing.
How do I check compatibility and inputs like USB-C, 3.5 mm TRS, and required adapters?
Verify the camera’s input: direct 3.5 mm TRS, USB-C with audio support, or proprietary ports. If the camera lacks an analog jack, use a USB-C audio adapter or the manufacturer’s receiver. Read specs for “audio over USB-C” or TRS pinout to avoid mismatches.
Should I pick wired or wireless microphones for mobility and control?
Choose wired for reliability and no latency. Wireless gives freedom of movement and fewer cable hassles but needs pairing, batteries, and monitoring. For high-motion shoots, wireless transmitters with secure mounts often work best.
How do I connect via adapters and cables for USB-C audio protocol and phone adapters?
Use certified USB-C audio adapters that support TRS or the camera’s digital audio protocol. For phones, use the correct lightning-to-3.5 mm or USB-C OTG adapter. Prefer adapters from DJI, Rode, or Sennheiser where possible to ensure compatibility.
What are secure mounting options like cold shoe, cages, clips, and cable management?
Mount small shotgun mics on the cold shoe or in a cage for stability. Clip lavaliers to clothing and route cables through harness points. Use cable ties or adhesive clips to prevent tugging and noise from movement.
How do I pair and link wireless transmitters and receivers?
Power both units, enable pairing mode, and follow the manufacturer steps—often a button press or menu command. Confirm both show the same channel and solid link indicator before recording. Test range and perform a quick walk test.
What reduces wind and background noise besides windscreens and placement?
Use deadcat or foam windscreens, position microphones behind the subject’s chest or shield from airflow, and add directional mics to reject side noise. Lower gain and use high-pass filters to cut rumble.
How can I monitor audio levels and use on-screen indicators?
Many action cameras and external receivers show input meters on the screen or via companion apps. Watch peaks and aim for headroom with no red clipping. If the camera lacks meters, monitor with headphones on the receiver or recorder.
What should I do for a quick test recording and gain adjustments before I roll?
Record a short clip with all gear mounted, speak at expected volume, then playback and check clarity and levels. Adjust gain so peaks sit below clipping. Re-check after adding wind protection or moving mounts.
How does Bluetooth pairing work for DJI Osmo Action 5 Pro with DJI Mic 3/2?
Osmo Action 5 Pro can pair with DJI Mic systems via Bluetooth or the camera’s USB-C receiver. Enable Bluetooth pairing in the camera’s audio settings, follow DJI Mic pairing steps, and confirm dual-mic support if using two transmitters.
What connections work for Osmo Action 4 and Osmo Action 3 using USB-C receivers?
These models accept USB-C receivers that support audio transport. Use high-quality USB-C to USB-C cables rated for audio. Avoid data-only cables that lack audio lines. Verify firmware compatibility for stable input.
How do I set up USB-C audio on DJI Action 2 via the front touchscreen or Power Module?
Attach the Power Module or compatible USB-C receiver, enable external mic input in settings if required, and check on-screen input meters. Secure the Power Module to maintain a stable connection during movement.
What are the steps for USB-C receiver connection and input monitoring on Osmo Pocket 3?
Plug the USB-C receiver into the Pocket 3, open the audio menu to confirm external input, and watch the on-screen meters. Adjust gain in the camera or receiver app and perform a short test clip to verify levels.
How do DJI Pocket 2 and original Osmo Pocket handle 3.5 mm TRS using the Do-It-All Handle or adapter?
Use the Do-It-All Handle or the official 3.5 mm adapter to connect a TRS mic. Attach the adapter securely, set the Pocket’s input to external mic if needed, and test levels. Adapters convert the port safely while preserving mic power where applicable.
What should I consider when using Osmo Mobile 6 or DJI OM 5 with phones and external mics?
Use a phone-compatible adapter for your microphone and balance the gimbal after attaching accessories. Ensure the phone’s audio settings accept the external mic and watch for app permissions that allow external input.
How do Ronin/RS series and Ronin 4D handle hot shoe mounting, TRS cabling, and audio channel settings?
Mount receivers or small mics on the hot shoe for a clean setup. Use TRS cabling to feed audio to the recorder or camera, and configure left/right channels in the camera’s audio menu. Secure cables to avoid motion noise.