Welcome. This short article gives a friendly, practical start on setting up a phone selfie stick kit and taking better shots with less hassle.
- Before You Start: Gear Check and Smart Prep
- How To Use Selfie Monopod With Remote
- Mounting and Adjustments: Secure Phone, Extend Stick, Set Angles
- Shooting Techniques: Lighting, Angles, and Smart Controls
- Safety, Etiquette, and Common Fixes
- Conclusion
- FAQ
- What should I check before attaching my phone to the holder?
- How do I pair the stick Bluetooth remote with my smartphone?
- What if wireless pairing fails — is there an alternative?
- How can I secure my phone without removing its case?
- What’s the best way to extend and lock the stick for steady shots?
- How should I angle the phone holder to frame a good portrait?
- How do I get better lighting for photos when outdoors or indoors?
- When should I use the remote shutter versus a timer?
- Any tips for stabilizing photos and avoiding blur?
- How can I take higher-quality shots using my phone camera?
- Are there safety or etiquette rules I should follow when shooting in public?
- What if my phone keeps slipping from the clamp?
- Why are my photos blurry even though the stick feels steady?
- Can I attach additional accessories like a small ring light or lens to the stick?
- How do I reset Bluetooth pairing if the remote won’t connect?
Most kits include an extendable stick, a clamp-style holder, and a Bluetooth control that pairs in seconds. Charge your phone and the tiny remote fully and check the LED on the controller for pairing status.
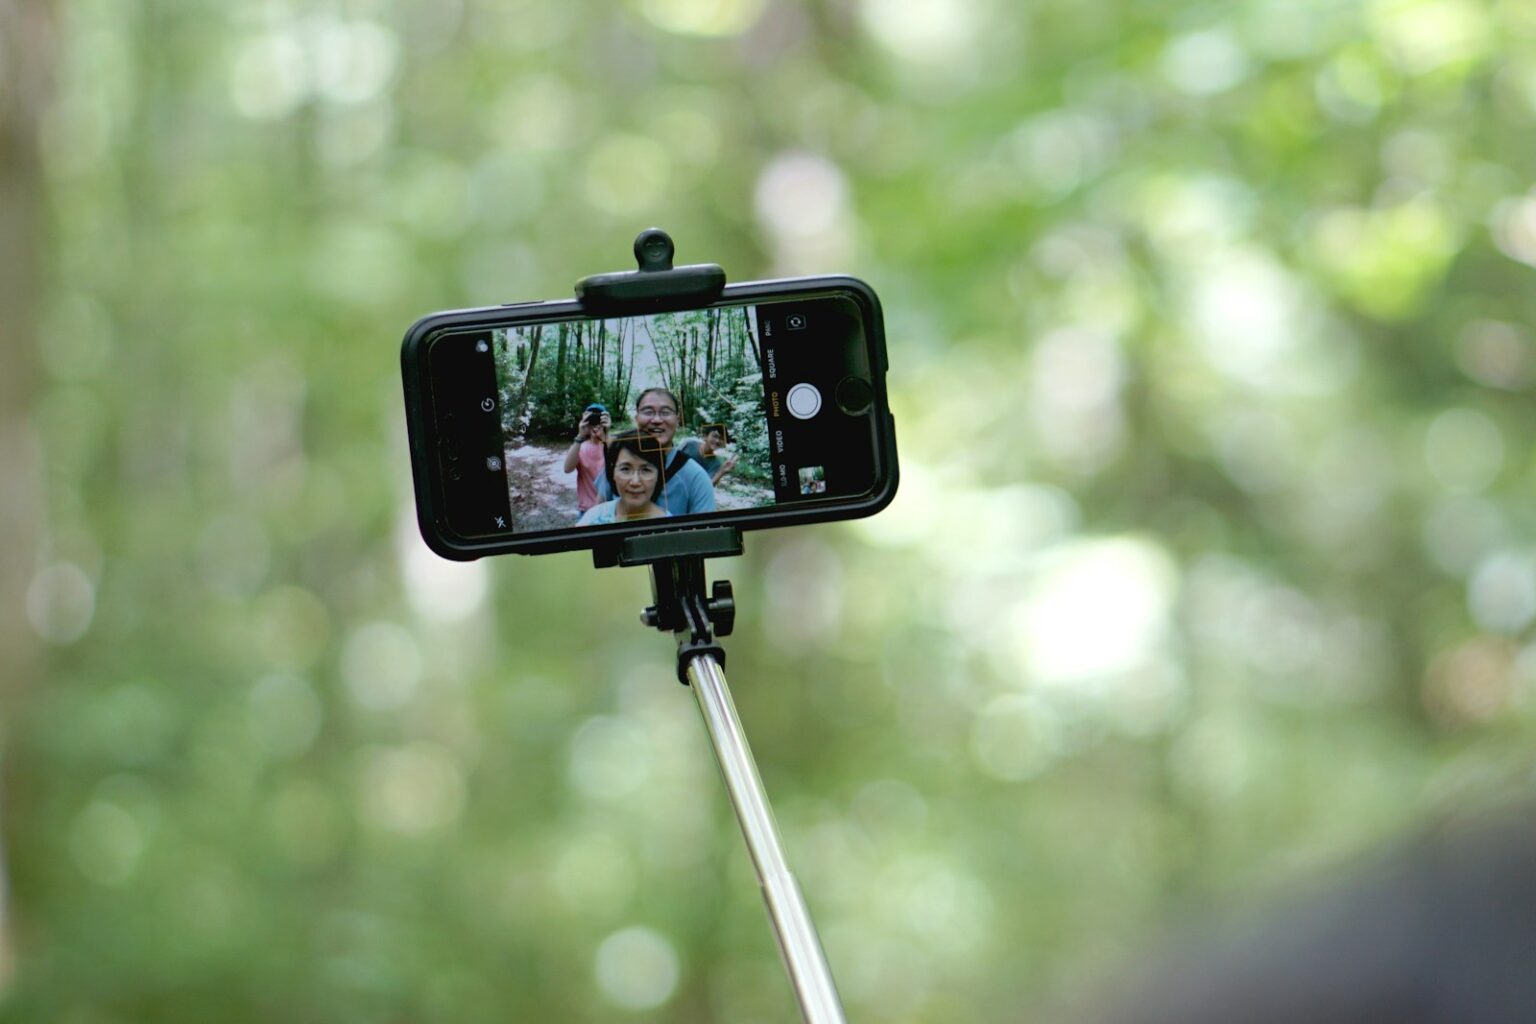
Mount your phone in the clamp—no need to remove most cases—and extend the stick until the frame looks balanced. Aim the camera slightly above eye level and keep the handle out of the frame for cleaner photos.
When Bluetooth fails, try the shutter cable option or a short timer so the controller can stay hidden. Small lighting tweaks and steady hands cut blur and lift your photography fast.
Read on for step‑by‑step setup, pairing fixes, safety tips in public, and quick fixes that make every photo count.
Before You Start: Gear Check and Smart Prep
Start with power. Fully charge your phone and the bluetooth remote control using the supplied USB cable until the LED turns solid. A full battery keeps connections stable and the shutter responsive.
Know each part. Typical kits include an extendable stick, an adjustable phone holder and a separate or built-in shutter control. Many models also accept a shutter cable as a wired fallback.
Check compatibility and weight limits before extending. Confirm the holder fits your phone and that the case doesn’t prevent a firm clamp. Test the stick indoors and gently shake it to ensure no bending.
- Learn the remote LEDs — blinking for pairing, solid when connected.
- Pack a microfiber cloth for the phone, the holder pads, and the lens.
- Keep a cable handy as backup and consider a small selfie ring light if you’ll shoot in low light.
For more setup tips and kit options, check a concise guide on selfie stick bluetooth.
How To Use Selfie Monopod With Remote
Start by waking up the phone’s Bluetooth. Power on the small controller and watch the available devices list. Select the controller name and accept any prompt. Common PINs are 0000 or 1234.
When paired, open the camera and press the shutter button to confirm a response. A steady LED usually means a successful connection. Keep the camera app visible while testing so each press is obvious.
Wired fallback and quick fixes
If wireless pairing stalls, plug the included cable into the headphone jack for a reliable wired shutter. When pairing loops, forget the entry in Bluetooth settings, reboot the phone and controller, then try pairing again.
- Turn Bluetooth off/on and retry pairing if the list is crowded.
- Move away from other devices that may interfere.
- Note the stick bluetooth remote name for faster reconnects later.
For a concise setup walk‑through, see this how to use selfie monopod guide.
Mounting and Adjustments: Secure Phone, Extend Stick, Set Angles
Place the phone into the holder, align it, then tighten until the device is held snugly. Open the clamp wide, center the phone, and close until the pads grip firmly. This secure phone setup usually works over a typical phone case.
If the case is bulky, test the size fit. Try a slimmer phone case if the holder can’t clamp properly. Many phone holders accept a compact camera via the 1/4-inch screw when the clamp is removable.
Extend the stick slowly, locking each section by twisting or snapping depending on the model. Keep most weight close to your body; a shorter length reduces shake and gives a steadier camera for the shot.
- Tilt and rotate the holder to frame foreground and background, then fine-tune the angles.
- Take a quick test shot and adjust the holder tilt if the horizon looks off.
- If your model has a handle-mounted shutter button, confirm you can reach the button comfortably.
- Consider a selfie stick tripod base for group shots to stabilize the phone while you join the frame.
Re-check clamp tension after a few moves; pads can compress and loosen. Avoid pointing the camera directly into harsh light; angle slightly to keep skin tones natural and reduce glare.
Shooting Techniques: Lighting, Angles, and Smart Controls
Aim for soft, even light. Step toward a window or shoot in open shade for flattering skin tones. Overcast skies act like a giant diffuser and make faces look natural.
Avoid strong backlight behind your head. If the sun or a bright window sits behind you, shift a few degrees or add a compact selfie ring light to fill shadowed areas.
Raise the stick a bit above eye level and tilt the phone down. This angle softens the jawline and helps keep the handle out of frame. Small shifts in position can change a shot dramatically.
- Set a short 3–5 second timer even when using the shutter control so your grip settles before the shot.
- Hold the grip with two hands or open a selfie stick tripod base for steadier photos and video.
- Wipe the camera lens with a microfiber cloth before shooting; fingerprints cut contrast and detail.
- When quality matters, switch to the rear phone camera for better resolution and low-light performance.
Tap your face on screen to lock focus and exposure for consistent results. Try a few shots at slightly different angles — tiny adjustments often yield the best images.
Safety, Etiquette, and Common Fixes
Before lifting a pole in public, pause and scan the area for hazards and other people. Many popular sites ban sticks, and using one near crowds or cliff edges can cause injury.
Respect venue rules. If signage or staff say no poles, leave it packed. At events, keep the pole low and out of other people’s sightlines.
A slipping phone? Fast checks
Tighten the holder and press the pads so they contact evenly. Bulky cases often reduce grip; try a slimmer case if the phone shifts.
Re-check clamps after walking; small vibrations can loosen a holder over time.
Blurry photos and simple fixes
Stabilize the grip with two hands or set the base on a flat surface or a selfie stick tripod. Tap the screen to refocus on your face, then reframe.
Clean the camera lens with a microfiber cloth and add light or change your angle when scenes are dim.
- If the bluetooth remote control misfires, restart both devices, re-pair, or plug in the cable for a wired shutter.
- In wind, shorten the stick to lower sway and protect the phone.
- When you switch to the rear phone camera, try voice prompts or the controller for easier framing.
| Problem | Quick Fix | When to escalate |
|---|---|---|
| Phone slips | Tighten holder, remove bulky case, add padding | Clamp damaged or pads worn |
| Blurry photos | Two‑hand hold, tripod base, tap to refocus, add light | Lens scratched or camera app malfunctioning |
| Controller fails | Restart devices, re-pair, use cable | Controller hardware fault or battery dead |
Conclusion
A short pre-shot checklist saves time: charge both the phone and device battery, confirm bluetooth pairing, and make sure the phone holder grips the phone snugly.
If pairing fails, swap to the wired shutter cable, then re-pair the bluetooth remote control when you have a moment. Extend and lock the stick sections, frame the camera slightly above eye level, and favor soft light for natural skin tones.
Stabilize shots with two hands or a compact tripod base, keep the lens clean, and respect venue rules. These small habits lift your mobile photography and make better photos more consistent.
Final tip: pack a spare cloth and a short charging lead so your smartphone and kit stay ready for the next great photo.
FAQ
What should I check before attaching my phone to the holder?
Make sure your phone, the Bluetooth remote, and any rechargeable stick battery are charged. Inspect the phone holder’s grips for wear, confirm the clamp width fits your phone with its case, and verify the stick’s weight rating so it supports your device and any lens adapter or small ring light.
How do I pair the stick Bluetooth remote with my smartphone?
Turn on the remote, enable Bluetooth on your phone, then select the remote name from available devices. Open your camera app and press the shutter button on the remote to test. If pairing prompts a PIN, try “0000” or “1234.”
What if wireless pairing fails — is there an alternative?
Yes. Many models include a shutter cable or wired connector that plugs into the phone’s headphone or charging jack. Attach the cable between phone and stick, mount the phone, then press the shutter button on the handle to take a photo.
How can I secure my phone without removing its case?
Choose a phone holder with spring-loaded arms that expand enough for your case. Center the phone, press it firmly into the clamp, and tilt the holder to check stability. If slipping occurs, use a slimmer case or add a small non-slip pad.
What’s the best way to extend and lock the stick for steady shots?
Extend sections one at a time, starting from the top, and tighten each twist-lock or flip clamp fully. Keep the center of gravity low by not overextending unless needed; that reduces wobble and improves stability for sharp images.
How should I angle the phone holder to frame a good portrait?
Tilt the holder so the lens points slightly downward from eye level—this flatters most faces. For group shots, use a wider angle and raise the stick higher. Make small adjustments while previewing the frame on your screen.
How do I get better lighting for photos when outdoors or indoors?
Face natural light, avoid strong backlight unless you want a silhouette, and use a portable selfie ring light when needed. If indoors, position yourself near a window or a soft light source to reduce harsh shadows.
When should I use the remote shutter versus a timer?
Use the Bluetooth remote for immediate captures and spontaneous poses. Choose a short timer (2–5 seconds) when you need both hands on the stick or when the remote isn’t paired. Timers also help reduce camera shake for sharper images.
Any tips for stabilizing photos and avoiding blur?
Hold the stick with both hands close to the handle, tuck elbows to your body, or set the stick on a tripod base if available. Wipe the lens clean, enable autofocus, and use faster shutter settings or burst mode when movement is likely.
How can I take higher-quality shots using my phone camera?
Use the rear camera whenever possible for better sensors. Clean the lens, disable digital zoom, and choose HDR or Pro modes for improved detail. Pair these with steady support from the stick and proper lighting for the best results.
Are there safety or etiquette rules I should follow when shooting in public?
Avoid crowded, restricted, or hazardous areas and respect venue rules—many museums and events ban extended poles. Be mindful of other people’s space and never use a stick in areas that could endanger you or others.
What if my phone keeps slipping from the clamp?
Tighten the holder, replace worn rubber pads, or switch to a slimmer case. If slipping persists, try a different holder model designed for larger devices or use a safety strap if your stick supports one.
Why are my photos blurry even though the stick feels steady?
Blurring can come from low light, slow shutter speed, or misfocused shots. Increase lighting, enable image stabilization, use a faster shutter setting, and ensure the camera focuses before pressing the shutter. Burst mode can also help capture a sharp frame.
Can I attach additional accessories like a small ring light or lens to the stick?
Many sticks support lightweight accessories. Check the stick’s weight limit and mounting options. Use compact LED ring lights or clip-on lenses that attach to the phone rather than adding heavy gear to the pole, which may cause imbalance.
How do I reset Bluetooth pairing if the remote won’t connect?
Turn off Bluetooth on your phone, power-cycle the remote, then re-enable phone Bluetooth and search again. If issues persist, unpair or forget the device on your phone, restart both devices, and attempt pairing fresh. Consult the manufacturer’s manual for a factory-reset option if available.